
Video content is becoming increasingly important for businesses and brands looking to engage their target audience. With the rise of platforms like YouTube and Facebook, videos have never been more popular. Animaker is an excellent, easy-to-use tool for creating professional animated videos without advanced technical skills.
In this comprehensive guide, you'll learn how to fully utilize Animaker to produce high-quality videos for your business, website, social media, and beyond.
An Introduction to Animaker
Animaker is a powerful yet user-friendly video creation platform that allows you to make animated videos for personal or commercial use. With Animaker, anyone can create studio-quality animation videos with zero experience required.

Some key features and benefits of Animaker include:
- Drag and drop interface for easily building scenes
- Professionally designed templates for quick video creation
- Ability to customize characters, backgrounds, props and more
- Library of over 1000000 free multimedia assets
- Dynamic animated video recording and editing tools
- Support for multiple video formats like MP4, AVI, MOV etc.
- Hosting and sharing options for video distribution
- Apps for iOS, Android, Windows and Mac devices
- Affordable pricing plans for individuals and businesses
Whether you need an explainer video, marketing content, online course, or any other type of animation, Animaker makes video production simple, quick and budget-friendly.
Getting Started With Animaker
Getting started with Animaker only takes a few minutes. Just follow these steps:
Step 1: Create Your Animaker Account
Go to Animaker.com and click on "Sign Up" to create your free account. You'll need to enter your name, email, password, and country to complete registration.
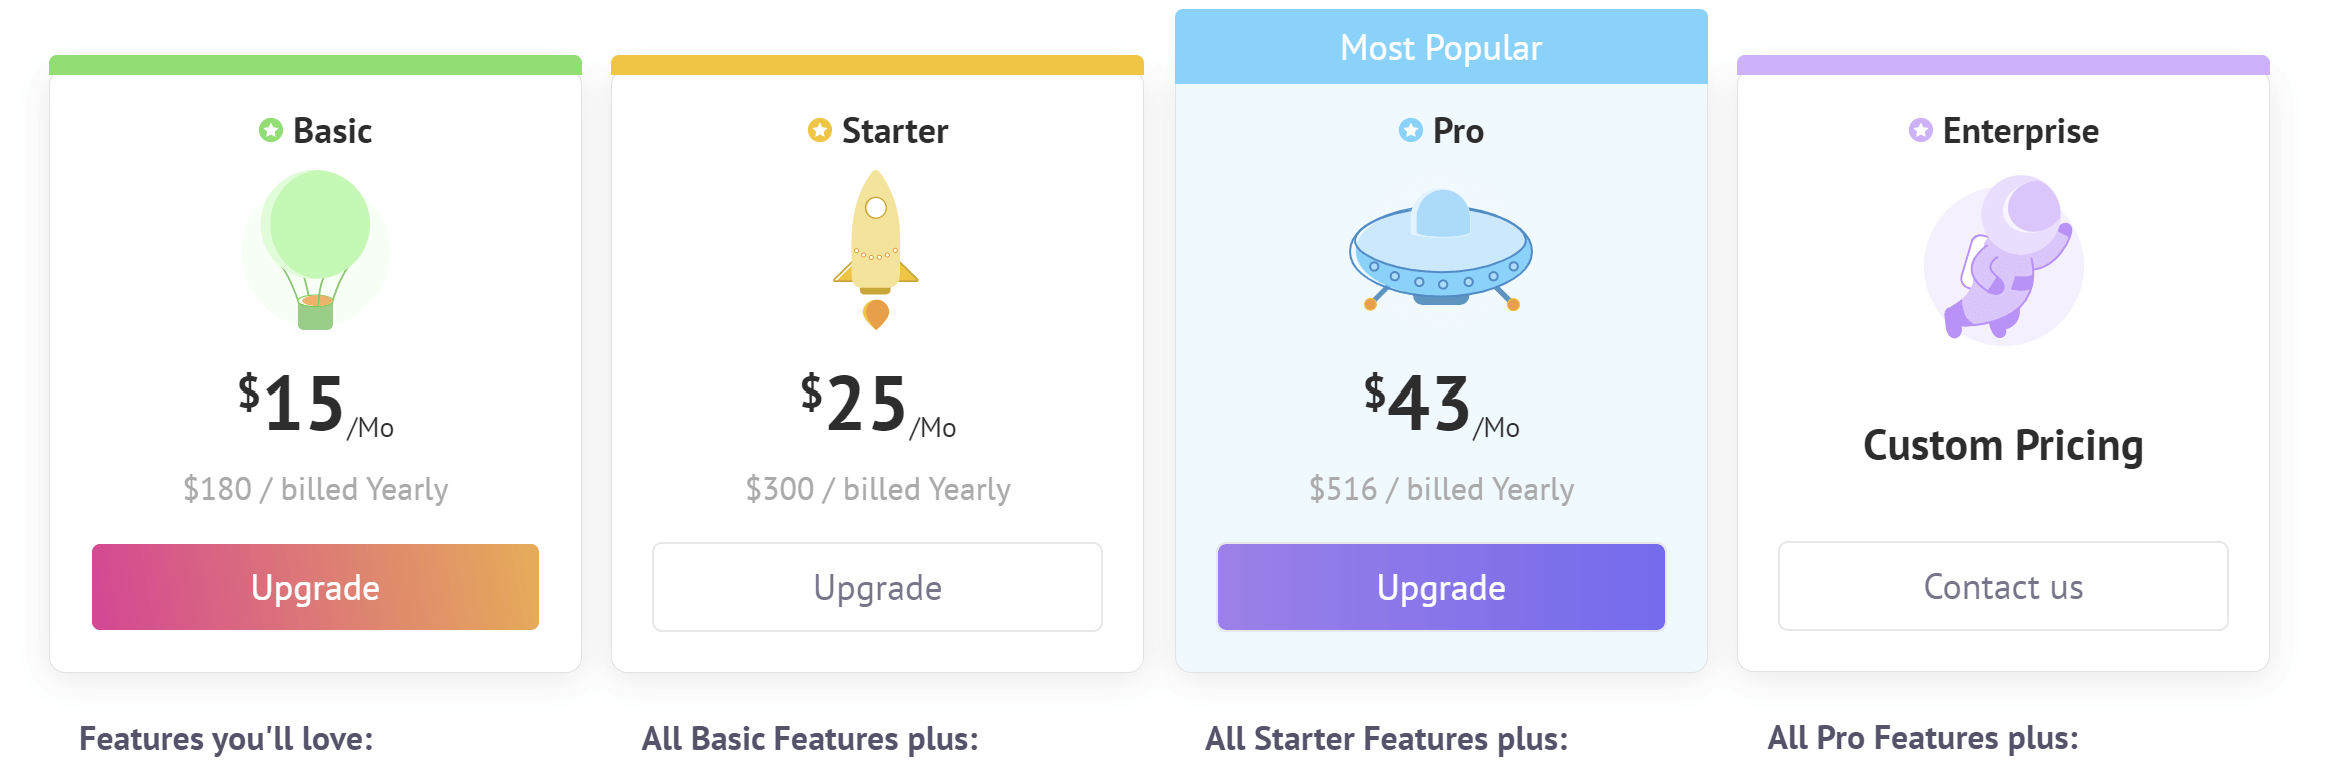
With the free plan, you can access all of Animaker's key features but with limited cloud storage and export capabilities. Paid plans start as low as $15 per month and unlock additional cloud storage, HD video downloads, and more.
Step 2: Familiarize Yourself With the Interface
Animaker uses a simple drag and drop interface that makes video production intuitive even for novices. The main workspace contains the following sections:
- Left sidebar: This houses all the assets, templates, animations, and tools for building your video.
- Central workspace: This is where you assemble scenes and edit your video timeline.
- Properties panel: Customize individual objects like characters, props, backgrounds etc.
- Animations tab: Add motions like entrance, exit, emphasis and path animations.
Spend a few minutes navigating the interface to understand what's possible when creating videos.
Step 3: Select a Template
Animaker provides professionally designed templates to make video creation even easier. Pick a template that best matches the style and purpose of your video.
You can choose from templates for explainers, marketing, eLearning, social media ads, and more. The template will load with sample visual assets that you can fully customize.
==> START YOUR TRAINING NOW! <==
Step 4: Customize the Template
Don't limit yourself to the default template. Make it your own by:
??????????
- Changing the scene backgrounds: Use solid colors, illustrations, photos or videos.
- Modifying characters: Adjust colors, facial features, positions, sizes and emotions.
- Adding props: Pick suitable objects, charts, shapes, logos and text boxes.
- Using animations: Give motions to different elements like entrances, emphasis and paths.
- Inserting audio: Upload voice overs, sound effects, background scores and music.
- Adding branding: Feature colors, logo and text to match your brand identity.
Take your time to utilize the wide range of customizations in Animaker until the template exactly suits your needs.
Step 5: Create Additional Scenes
Most templates only contain a few placeholder scenes. To tell your full story, you'll need to create additional scenes from scratch.
Add new scenes by clicking the "+" button. Then customize each scene using steps 3 and 4 above. Create as many scenes as your story requires.
Use transitions like fade, wipe and zoom to smoothly move between scenes. Re-arrange scenes easily via click-and-drag.

Step 6: Record Voiceover and Audio
Voiceover narration and relevant audio are key for an impactful video. Animaker lets you easily integrate audio right in the editor.
For voiceovers, click the microphone button to record directly in Animaker. For the best results, use a quality external mic instead of your device's built-in option.
You can also upload any pre-recorded audio files like music tracks and sound effects. Drop them into the video timeline wherever needed.

Step 7: Preview and Export Your Video
Once your scenes, visuals, animations, voiceovers and other audio are in place, preview your entire video. Watch carefully and make tweaks until you're fully satisfied.
Lastly, export your completed video by clicking the Export button. Animaker supports MP4, AVI, MOV and other formats. The higher your Animaker subscription level, the higher quality you can export at.
And that's it! With these seven steps, you can leverage Animaker to produce professional-grade animated videos with ease.